February 18, 2012

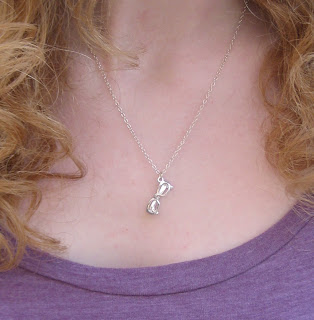
Mini Sunglasses Necklace

It was like my inner nerd, librarian, and beach babe all needed to express themselves through jewelry, and this is the sparkly little bauble that they agreed on.

Light, mini sized, and made from either a 14K gold fill/gold vermeil combo or solid sterling silver.   


And it's here in time to enjoy some summer sun.  Find it with many other treasures at the Daffodil Boutique.


post signature

January 21, 2012

Easy Shoe Storage

Pin It
Next stop in the Organizational Bliss series is shoe storage.  And it's definitely a hot topic based on the amount of activity about it on Pinterest. But few of those ideas are as easy and cheap as the solution we found at Ikea today.  

Like everyone else, we have a shoe avalanche to contend with. We also have a tot who loves her shoe variety and can be forgetful about putting them away. Of course we cut her some slack because she is only two, and, more importantly, there isn't any place designated for her shoes - until the Ikea "Kusiner" wall pockets came on the scene.


A couple of Command Hookskeep it secured to the wall.


The total for this sweet little set up?

Ikea Kusiner Wall Pockets: $3.99
A package of Command Hooks: $5.63

$9.62 for shoe storage that's compact, off the floor, non-damaging to our walls, and easy to access for our tot?  That's a little slice of organizational bliss for sure.


post signature

January 8, 2012

Peanut Brittle Biscotti

Pin It

Peanut brittle is a candy from another generation.  Considered "Olde Tyme"-y, it's found usually during the holidays because of its association with nostalgic Christmas candies and confections. But the carmelized nutty sweetness of peanut brittle deserves a second glance.  

I've been making peanut brittle for years for someone very special to me, my Grandpa Missy.  "Missy" was the name of their adored family cocker spaniel that predated me and the other grandchildren by at least 10 years.  But the name still stuck and so did my Grandpa's life long fondness for peanut brittle.  Peanut brittle for him as a kid must have been the equivalent of my Snickers and Starburst.  Because of distance, I couldn't see my grandpa very often.  But I'd try to shorten those miles by sending him packages of homemade peanut brittle as often as I could.  One day, while on a biscotti-baking binge, I added a handful of crushed peanut brittle that was left over after the care package I'd packed for him couldn't fit any more.  The jagged little nuggets folded into the biscotti batter and cooked up like the two treats were meant to be together along.  My grandpa agreed.  He loved the peanut brittle biscotti too. 

Grandpa and Great-Granddaughter meet
This past November, the kindest grandpa a granddaughter could ask for passed away peacefully and quietly into the presence of Jesus and the company of my Grandma Missy and their eldest son.  I miss my grandpa very much.  But I know he is with his Savior.  He is probably enjoying an arm-locked stroll with my grandma through heaven's greenery right now.  They might even be nibbling on some peanut brittle too.   Below is the recipe I created for him, and I hope you'll enjoy it too.

Peanut Brittle Biscotti
makes approx 28 long biscotti

Ingredients:
2 cups flour
1 teaspoon baking powder
1/4 teaspoon salt
1 cup granulated sugar
6 tablespoons (3/4 stick) unsalted butter
1 egg
1 egg yolk
1 teaspoon vanilla
3/4 cup crushed peanut brittle

Directions:
Preheat oven to 325 Fahrenheit. Line a baking sheet with a silpat mat or a piece of parchment paper to prevent sticking.

In a medium bowl, whisk flour, baking powder and salt.

In a mixer, cream the butter and sugar until light and fluffy.  Scrape down and beat in the egg and egg yolk. Beat in the vanilla extract.

Add the dry ingredients to the creamed butter.  Mix until all ingredients come together into a moderately stiff dough. Divide the dough in two mounds on the baking sheet. Shape each half of dough into a 9-inch by 3-inch rectangle.  The dough will spread considerably so give yourself ample room between the logs. If you prefer, you can brush an egg wash (one egg beaten with 1 tablespoon water) over the biscotti logs.  But I haven't done that here. 

Bake for 20 minutes. Rotate the cookie sheet for even baking and bake for 20-25 more minutes until golden and firm to the touch.

Remove from the oven and let the biscotti cool until able to handle. Using a serrated knife, cut logs into 1 inch wide diagonal slices.  Try to cut each biscotti in one smooth motion.  This will give your biscotti nice clean edgeswithout snagging the sides.

Place biscotti cut side down on baking sheet.  Because of the now melted peanut brittle inside, handle with care and prop them up on their sides up gently. Bake again until pale golden, about 10- 20 minutes.  Check every 5 minutes to ensure that they're not too browned.  If desired, flip biscotti half way through.


post signature

December 28, 2011

DIY Cleaning Solutions

Pin It

Christmas is over.  But this will not be a glum post about missing the holidays. Instead I'm excited for the new year.  Packing away the decor leaves fresh, open spaces and loads of possibilities. My guests have gone home and I'm imaging ways to hostess next year so that opening up our home will be more fun, seamless, and welcoming.  I do love Christmas, but it is time to move on and embrace what's ahead.

So this brings me to the Organizational Bliss project.  As I took down that decor, I got an eyeful of some spaces that need a good cleaning. I could blow the equivalent of dinner and a movie on cleaning products, but there are simple homemade alternatives.  I recently checked out Tsh Oxenreider's book, Organized Simplicity, The Clutter-Free Approach to Intentional Living from my local library.  The most valuable part of it for me was the bevy of cheap, natural cleaning solution recipes for just about every stain or mess in the house.  And I'm going to share them with you.

In a few places I've noted that washing soda is not the same thing as baking soda.  Washing soda, sometimes called soda ash or soda crystals, is a cleaning agent that works well on oil and alcohol based stains. It is not interchangeable with baking soda.  Substituting baking soda will reduce the effectiveness of the solution. Washing soda can be purchased at your local market and at Soap.com.  If you buy on Soap, remember to shop through BigCrumbs to get cash back. Read here for more details about how BigCrumbs works.

And now the recipes.

Carpet Cleaner, Heavy Duty
1 part salt
1 part white vinegar
1 part borax

Mix the ingredients into a paste and rub on the affected area.  Let it sit for a few hours.  Then scrub away with a brush or damp cloth.  Make only as much as you need because it doesn't store well.

Dishwasher Soap
1 part borax
1 part washing soda (*not baking soda)

Mix the ingredients and substitute in equal measures as you would for your regular dishwasher soap.  If your water is particularly hard, increase the amount of washing soda.

Furniture Polish (for unvarnished furniture only)
1/4 cup olive oil
4 Tbsp white vinegar
2 Tbsp lemon juice

Combine all ingredients in a spray bottle and shake well before each use.  Store any extra in the fridge because lemon juice can spoil. 

Glass Cleaner
 2 tsp white vinegar
1/4 gallon water

Combine in a spray bottle.  Works best when used with crumpled newspaper to wipe down the surface.


Laundry Soap
1 cup unscented, dye-free soap (such as Ivory), grated or ground with a food processor
1/2 cup washing soda (*not baking soda)
1/2 cup borax
A few drops of essential oil for scent, optional

Combine and store in a  labeled container.  Use 1 tablespoon for lighter loads; 2 tablespoons for heavy loads.

Mold Remover
1 part hydrogen peroxide (found at drugstore)
1 part water
A few drops of essential oil, optional

Mix the ingredients in a spray bottle.  Let the cleaner sit on the stain for about an hour before scrubbing off.


Oven Cleaner 
3/4 cup baking soda
1/4 cup salt
1/4 cup water
    Mix the ingredients into a paste and apply over a dampened area.  Let sit overnight.  Then scrape off and rinse clean.


    Toilet Bowl Cleaner
    1/4 cup baking soda
    1 cup white vinegar
      Combine all ingredients and pour into the toilet.  Let it sit for a few minutes, and then scrub with a toilet brush and rinse.

      Calcium, Lime and Rust Remover
      1/4 cup white vinegar
      1 Tbsp borax
      1 Tbsp liquid dish soap
      2 cups water

      Combine in a spray bottle and spray on affected areas and then scrub.  For tough spots, apply baking soda the area to add extra scrubbing power. (Recipe courtesy of this page).

      Tsh also runs a smart little blog, The Simple Mom, with lots of inspiring ways to down-size, declutter, and live life more thoughtfully.  I recommend a browse when you need a break from cleaning or maybe a post-Christmas pick-me-up.

      Happy cleaning and happy new year!

      post signature

      Image sources ||||||||||

      December 1, 2011

      Swagbucks Explained


      I don't do full retail price very well.  As a deal seeker, a coupon code scavenger, and a shipping fee dodger, paying sticker price almost physically hurts. Swagbucks is one of the ways I avoid full retail price pain.  If you're not "swagging", here's a tutorial on how simply browsing the internet can send cash your way.

      What is Swagbucks?

      Swagbucks is a search engine just like Google, Yahoo!, or Bing.  But when you enter a term to search, "cute baby animals" for instance, you'll earn points, or "Swag bucks", toward gift cards and other items.

      Here's what happened when I hit enter after typing in "cute baby animals". 


      Score 9 Swag bucks for me! These Swag bucks are automatically totaled at Swagbucks.com and can be redeemed for some very useful things such as gift certificates or other prizes, such as electronics, jewelry, toys, housewares and more. If you're thinking, "Eh, the gift cards are probably to places I never shop at", may I offer the following as a mere snippet of the sites where Swagbucks offers gift cards:
      • Amazon
      • PayPal
      • Barnes & Noble
      • Travelocity
      • Starbucks
      • Sears
      • Lowes
      • KMart 
      • Dominoes Pizza
      • Fandango
      • CVS
      • GAP
      • JCPenney
      and many, many more.

      So What's the Catch?

      There aren't any true catches with Swagbucks. But there are some things to consider to make your swagging experience as rewarding as possible.  

      Sort of Catch #1: Not every search earns Swag bucks.  It's about every 8th or 9th search. The points range from 5 to 50 points each time.

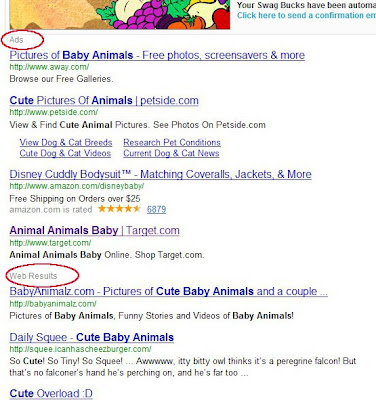
      Sort of Catch #2: The first few links to load will be from sponsored ad sites.  The rest of the un-sponsored web results are right below those.  Like this:


      I'll be blunt; Swagbucks is no Google.  If I need to do in-depth searching on a topic, I google it.  But if I just want to find something easy like the name of a website, maybe a recipe site, an online store, or email, then I use Swagbucks.  And don't tell the Swagbucks folks, but I mentally skip over the ads and go right to the web results, unless what I need turns up in the ads section.  Sometimes it does.

      How do I start?

      Just register at Swagbucks.  It takes, like, 2 seconds.  Maybe 3.  And international deal hunters, Swagbucks is for you too.

      How Do I Earn Swag bucks as Fast as Possible?

      There are 6 main ways round up the points quick. Number 2 is my favorite.

      1) Install and use the search toolbar.  When I need to search for something fast, I don't have to navigate way from the tab I'm browsing on.  I pull down the drop down menu and choose the Swagbucks search engine.  Here's a snapshot of what mine looks like,


      The toolbar can be downloaded from the Swagbucks site.  Look for the "Toolbar" menu item on the main page after you register. 

      2)  Find "Swag codes" easily on sites like sbcodez.com.  These Swag codes are just a combo of letters and/or numbers and can be entered on the main page at Swagbucks for instant points.  

      3) Follow Swagbucks on Twitter and Facebook to see the swag codes that they randomly give out. 

      4) Rack up on points fast by participating in surveys and watching sponsored videos on their site.  Swag bucks can also be earned by making purchases though their site, participating in polls, or playing games there too.

      5) Search with Swagbucks on Fridays.  Fridays are "Mega-Swagbucks" days, and the points are even greater on these days.

      6) Download the Swagbucks Search App on your Android phone.  Any searches you do on it can also earn points.

      If you found this info helpful or have other strategies for successful swagging, please share by submitting a comment.  I love to read your messages.

      post signature


      November 13, 2011

      Organizational Bliss: A DIY File Folder


      When I started Operation Organizational Bliss, tackling the counter tops was a top priority.  I don't need to tell anyone how easy it is for these spots to attract clutter.  You already know.  

      I have one counter top that is a particular mess magnet.  It's where our tot's art project supplies accumulate.  See for yourself.


      I could try to train myself to put those things elsewhere, but that would be like trying to force a square peg through a round hole.  The craft stuff gets deposited there because it's easy to reach, and the items stay in view so they aren't forgotten. It's a natural place for them.  And I'd rather not retrain myself if I don't have to. I don't want to serve our organized spaces. I want our organized spaces to serve me.  That's when the bliss happens.

      So the craft supplies need to be in that location, in view, nicely displayed, and done on a dime.  It's a tall order.  One that will need multiple solutions.  This week, I got in gear on the first solution by DIYing a file folder to house the coloring books, loose leaf sheets of paper, sticker sheets, and a few of mom's cooking magazines too.  Sure, I could've bought a file folder.  But my local HomeGoods store wanted to sell me a cheapy cardboard version with a dizzying paisley print for $14.99.  Nuh uh.  So I made my own and customized it exactly how I wanted for a fraction of the cost. Here's the play-by-play.

      DIY File Folder Tutorial

      You'll need:
      • cardboard box
      • duct tape
      • fabric to cover
      • Elmer's glue
      • colored paper or contact paper
      • white spray paint (optional)
      • stiff card stock (optional)

      Step 1
      Step 1 - Start with a sturdy cardboard box. The thicker your cardboard, the nicer your final product will be.  Cut out the pieces to form the sides and bottom of your file folder.  I'm not getting super detailed on this because the pictures tell most of the story.  For a rough idea on dimensions, this file folder is approximately 12" h x 9" l x 4" w.  


      Step 2

      Step 2 - Tape the sides and bottom of your file folder together using a thick tape.  Duct tape is an obvious choice.  You can use camo colored duct tape if you want it to look extra tough like mine. Hooah!  Another reason to use duct tape? It will help seal the bottom from any spills that happen on the counter top.

      Step 3
      Step 3 (optional) - I knew my fabric was thin and that striking green duct tape would show through.  So I spray painted my file folder white.  Skip this if your fabric provides enough coverage.

      Step 4
      Step 4 - Cut your fabric into a rectangle large enough to wrap around the whole file folder.  Allow for at least 2" of extra fabric on the top, bottom and sides so that you can tuck and glue it with ease.  Glue your fabric to the cardboard.  The seam should start and end in the back.  And remember to check that the pattern is oriented in the right direction on your file folder.

      At this point your file folder looks like this.  (Note that I didn't cut the fabric to along the slanted edges yet.  It's easier to trim those pieces after gluing to the sides).


      Step 5
      Step 5 - Trim the excess fabric, fold neatly inside the corners (pleats work well), and glue.

      Step
      Step 6 - Take some coordinating colored paper and cut it to fit inside the file folder.  I used blue wrapping paper because I liked its glossy finish.  But it was also very flimsy.  So I taped it around a thicker piece of card stock.  And by card stock, I mean a couple junk mail fliers taped together and trimmed to size.

      Step 7

      Step 7 - Last step! Glue the colored paper (exposed side of the flier faces the glue) into the file folder.  I turned my file folder on its side and laid a heavy book inside it to help the colored paper bond nice and flat to each side of the file folder. You could also use contact paper instead and skip the gluing.

      And the finished product with the world's cutest product model too.  Those Barker Beauties ain't got nothin' on this.


      We had a "before" so we need an "after".  One more time.


      I can see more counter space already.  On our way to Organizational Bliss!

      post signature

      November 9, 2011

      New Design Sneak Peek


      As a treat for the Everything's Coming Up Daffodils followers, here's a first look at a new necklace design coming soon to my Etsy shop.  Naturally, it's simple, available in gold or solid sterling silver (shown), and a little bit quirky.  And in line with all of my other Daffodil Boutique pieces, it will also be very reasonably priced.

      post signature